

Microsoft Entra Privileged Identity Management (PIM) is a feature within Microsoft Entra ID (formerly Azure Active Directory) that provides a way to manage, control, and monitor privileged access to important resources in your organization. PIM is specifically designed to enhance security by providing just-in-time (JIT) access, time-bound access, and approval workflows for elevated permissions.
Reasons to Use Microsoft Entra Privileged Identity Management (PIM)
Organizations increasingly adopt PIM to maintain a balance between security and operational efficiency when managing access to critical resources. Here are the key reasons why:
Minimize Security Risks:
- Malicious Actor Mitigation: Reducing the number of individuals with standing administrative access decreases the likelihood of a malicious actor gaining unauthorized control over sensitive resources.
- Inadvertent Impact Reduction: Limits the possibility of authorized users accidentally making changes that could disrupt critical systems or compromise data.
Enable Just-in-Time (JIT) Access:
- Allows users to request and activate privileged access only when needed, ensuring that administrative permissions are not always active, thus reducing the attack surface.
Monitor and Audit Privileged Activity:
- Track what users do with their privileged access, providing visibility into their actions for security and compliance purposes.
- Generate reports and audit logs to meet regulatory requirements and support incident investigations.
Support Business Needs:
- Users still need to perform privileged operations in environments like Microsoft Entra ID, Azure, Microsoft 365, and SaaS applications. PIM enables these activities securely by providing time-limited and controlled access.
Streamlined Role Management:
- Assign and manage access to sensitive resources dynamically, ensuring only the right individuals have access at the right times.
Comply with Regulations and Standards:
- Many compliance frameworks require organizations to manage privileged access effectively, and PIM helps organizations meet these standards by providing detailed logs, alerts, and workflows for access control.
Strengthen Conditional Access Policies:
- Integrate with Microsoft Entra Conditional Access to enforce multifactor authentication, device compliance checks, or network requirements before granting privileged access.
License Requirements
o use Microsoft Entra PIM, your organization must meet specific licensing requirements. PIM is included as part of certain Microsoft Entra ID (formerly Azure Active Directory) plans. Here are the key points:
Required Licenses:
- Microsoft Entra ID P2 (Premium Plan 2) includes PIM as a feature.
- PIM is not available in the Microsoft Entra ID Free or Premium Plan 1 (P1) tiers.
What Does Microsoft Entra Privileged Identity Management (PIM) Do?
Microsoft Entra PIM is designed to help organizations manage and secure privileged access to critical resources. By implementing time-based and approval-based role activation, it minimizes risks associated with excessive, unnecessary, or misused access permissions. Below are the key features and functionalities of PIM:
Key Features of PIM:
Just-in-Time Privileged Access:
- Enables users to activate privileged roles only when needed, reducing the risk of standing permissions.
Time-Bound Access:
- Assigns access to resources for specific durations, with start and end dates, ensuring permissions are automatically removed after a set period.
Approval-Based Role Activation:
- Requires users to request access and obtain approval from designated approvers before activating privileged roles.
Multifactor Authentication (MFA):
- Enforces additional security by requiring MFA for role activation.
Justification Requirement:
- Prompts users to provide reasons for activating roles, improving visibility into access needs.
Notifications:
- Sends alerts when privileged roles are activated, keeping administrators informed of access changes.
Access Reviews:
- Facilitates periodic reviews of role assignments to ensure users still need access and roles remain relevant.
Audit History:
- Provides downloadable audit logs for both internal and external compliance audits.
Critical Role Protection:
- Prevents accidental or intentional removal of the last active Global Administrator and Privileged Role Administrator role assignments, maintaining administrative continuity.
What Can You Do with Microsoft Entra Privileged Identity Management (PIM)?
After setting up Microsoft Entra PIM, administrators have access to a variety of tools and options in the left navigation menu. These options allow for the effective management of roles, resources, and activities. Here’s what you can do with PIM:
Tasks, Manage, and Activity Options:
The navigation is divided into three main categories:
Tasks:
- Perform quick actions such as activating or assigning roles.
- Approve or deny role activation requests.
Manage:
- Configure settings for Microsoft Entra roles, Azure resource roles, or PIM for Groups.
- Set up role assignment policies, approval workflows, and access review schedules.
Activity:
- Monitor role activations, requests, and other events.
- View logs and generate reports for compliance and auditing.
Management Options:
Microsoft Entra Roles:
- Assign and manage roles such as Global Administrator, User Administrator, and more.
- Configure just-in-time access for Entra ID roles.
Azure Resource Roles:
- Manage roles specific to Azure resources, such as Virtual Machine Contributor or Network Administrator.
- Apply time-bound or approval-based policies to resource roles.
PIM for Groups:
- Assign roles and manage access permissions for groups in Microsoft Entra ID.
- Implement access reviews for group memberships.
What You Can Manage:
Role Assignments: Assign roles with just-in-time or permanent access and specify conditions like time limits or approver requirements.
Activation Policies: Define policies that govern role activation, such as requiring justification, MFA, or approval.
Notifications: Set up email notifications for role activations and other privileged activities.
Access Reviews: Schedule periodic reviews to ensure users still require the roles or access they’ve been assigned.
Audit Logs: Track and download logs of role assignments, activations, and modifications for compliance or internal review.
Role Assignment Overview
PIM role assignments provide a secure and efficient way to grant and manage access to organizational resources. Here’s an overview of the role assignment process and its key components:
Role Assignment Process:
Assign Roles to Members:
- Assign roles to eligible users (those who can activate the role) or permanent users (those who always have the role).
- Configure start and end dates for temporary role assignments.
Activate Assignments:
- Eligible users can activate their assigned roles when required. This triggers processes such as requiring justification, multifactor authentication (MFA), or approval.
Approve or Deny Requests:
- Approvers receive notifications when a user requests role activation.
- Approvers can review the request and either approve or deny it based on organizational policies.
Extend and Renew Assignments:
- Users can request an extension or renewal of their role assignments before they expire.
- Administrators can review and decide on these requests.
Notifications and Email Alerts:
PIM keeps stakeholders informed by sending automated email notifications to relevant participants. Notifications include links to tasks like activating roles or approving requests. Examples of notifications:
- A request for role activation.
- Approval or denial of a request.
- Updates to role assignments.
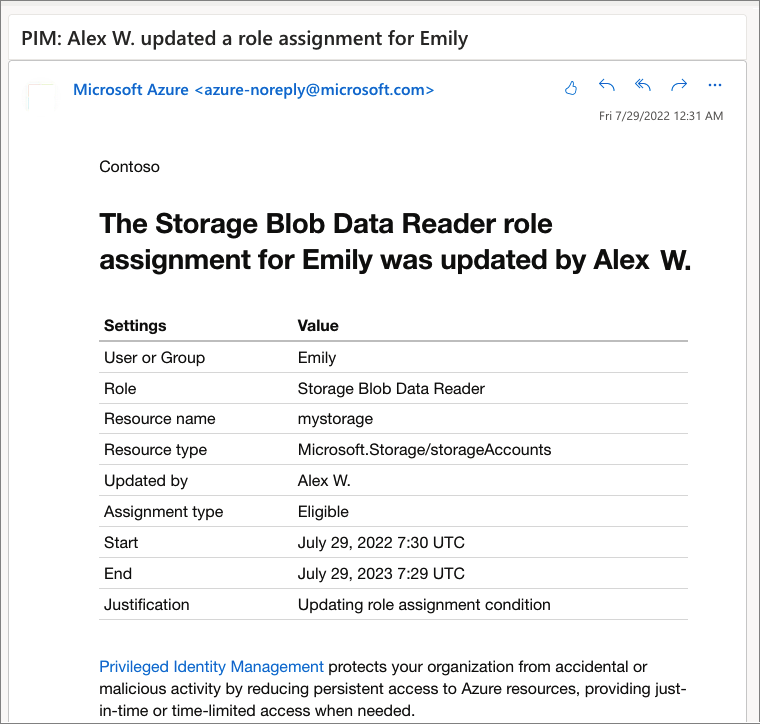
Example: Notification Email:
The screenshot described typically shows:
- Subject: A notification about a role assignment change (e.g., “Role Assignment Update”).
- Body: Details of the change, such as:
- The action taken (e.g., Alex updated a role assignment for Emily).
- Links to relevant tasks or details, such as the role description or next steps for approval.
Benefits of PIM Role Assignments:
- Security: Provides controlled, just-in-time access to critical resources.
- Transparency: Keeps participants informed of actions through automated notifications.
- Efficiency: Streamlines the process for role activation and approval.
Steps for Assigning Roles:
-
Choose the Role:
- The administrator selects the role to assign, such as Global Administrator, Billing Administrator, or a custom role.
-
Select the Assignees:
- Assign the role to specific members, groups, service principals, or managed identities.
-
Define the Scope:
- Limit the role’s permissions to a particular set of resources, such as specific subscriptions, resource groups, or management groups.
-
Set the Assignment Type:
- Eligible Assignment:
- Requires members to perform an action, such as activating the role or obtaining approval.
- Provides just-in-time access to minimize standing privileges.
- Active Assignment:
- Grants immediate and continuous access to the assigned role without additional actions.
- Eligible Assignment:
-
Specify the Duration:
- Assign a start and end date for temporary roles or mark the assignment as permanent.
- For eligible assignments, members can activate the role only during the specified time frame.
- For active assignments, members have ongoing access within the set duration.
Key Components of Role Assignment:
- Members/Owners: The users or entities receiving the role.
- Scope: Defines which resources or areas the assigned role applies to.
- Type: Determines whether the role is eligible or active.
- Duration: Sets the timeframe during which the role can be used.
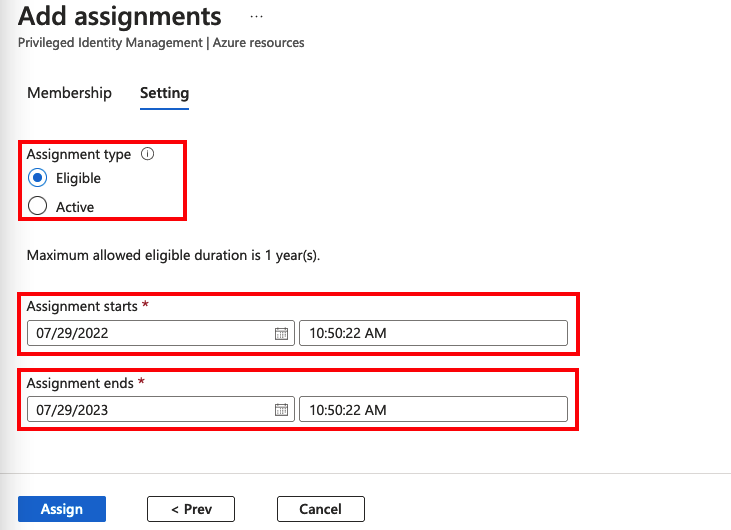
Example: Role Assignment Interface:
The screenshot likely displays:
- Role Name: The name of the role being assigned.
- Assignment Type: Options to select “Eligible” or “Active.”
- Scope: A dropdown or selection for resources like subscriptions or resource groups.
- Duration: Fields for start and end dates or a toggle for permanent assignments.
- Approvers: Fields for defining who can approve activation requests (if applicable).
Steps to Activate a Role:
-
Navigate to PIM:
- Open the Microsoft Entra Admin Center.
- Select Privileged Identity Management from the navigation menu.
-
Access Eligible Roles:
- Under My Roles, locate the list of roles for which the user is eligible.
- Identify the role to activate and select Activate.
-
Provide Activation Details:
- Specify the activation duration within the maximum time allowed (configured by the administrator).
- Enter a justification or reason for the activation request, such as performing a specific task or troubleshooting an issue.
-
Complete Any Required Actions:
- Depending on the organization’s settings, users might need to:
- Perform multifactor authentication (MFA).
- Obtain approval from designated approvers before the activation is granted.
- Depending on the organization’s settings, users might need to:
-
Submit the Request:
- Review the activation details and submit the request.
- If approval is required, the request is routed to the approvers, and the user is notified upon approval or denial.
Key Features of Activation:
-
Time-Limited Access:
- Users can only activate the role for a defined duration, minimizing the exposure of privileged permissions.
-
Justification Requirement:
- The activation process requires users to provide a reason, adding context for approvers and audit logs.
-
Approval Workflow:
- Administrators can configure approval requirements for certain roles to enhance control.
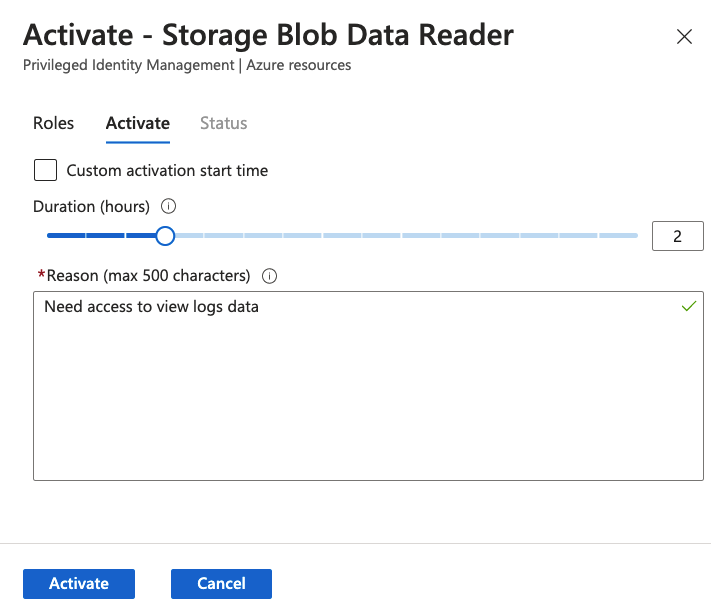
Example: Activation Interface:
The screenshot likely displays:
- Role Name: The name of the role being activated.
- Duration: A field to specify the activation time, limited to the administrator-configured maximum.
- Justification: A text box for users to explain why they need the role.
Approve or Deny Requests in Microsoft Entra
Approve or Deny Role Requests:
Notifications for Approvers:
- Delegated approvers receive email notifications when a role activation request is pending their action.
- Notifications include details of the request, such as the role, the requester, and the justification.
View Pending Requests:
- Approvers log into the Microsoft Entra Admin Center and navigate to PIM.
- In the Pending Requests section, they can view all requests awaiting action.
Approve or Deny the Request:
- Approvers can review the request details, including the justification provided by the requester.
- Based on the review, they can:
- Approve the request, granting the user or group access to the role.
- Deny the request, preventing access.
Outcome:
- If approved, the user can immediately activate and use the role.
- For example, if a user is assigned the Contributor role for a resource group, they can manage that group after approval.
Extend and Renew Assignments in PIM
To handle time-bound role assignments, PIM allows users to extend or renew roles as needed:
Extend Assignments:
- When a role assignment is close to expiring, users can request an extension to retain access.
- This ensures continuity without gaps in access.
Renew Assignments:
- If a role assignment has already expired, users can request a renewal to regain access.
Approval Process:
- Both extensions and renewals require approval from a Global Administrator or a Privileged Role Administrator.
- Approvers receive notifications and can approve or deny requests using the PIM interface.
Administrator Convenience:
- Admins don’t need to manually manage assignment expirations.
- Instead, they can handle extension and renewal requests as they arise.


Leave a Reply