
Access packages must be organized within a container called a catalog, which defines the resources that can be included in the package. If no specific catalog is chosen, the access package is placed in the general catalog. Note that existing access packages cannot currently be moved between catalogs.
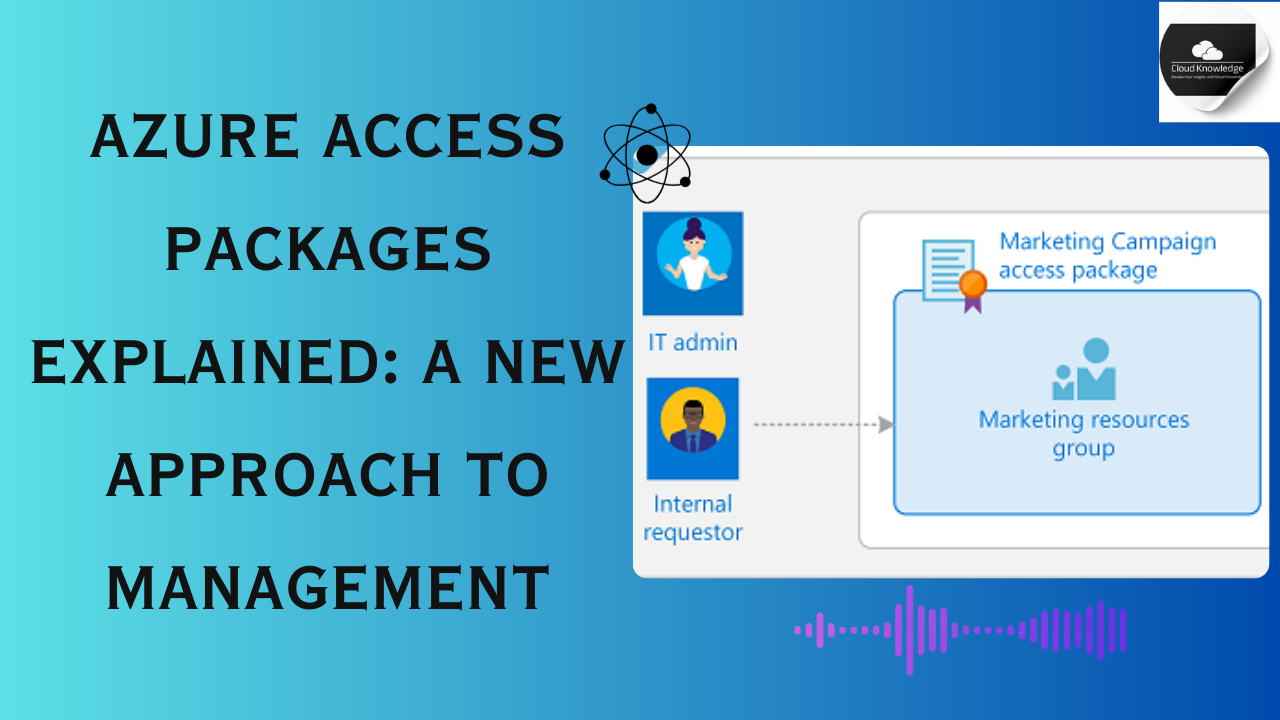
Access packages enable the assignment of roles across multiple resources included in a catalog. Administrators and catalog owners can add resources to a catalog when creating an access package or later. Any updates to the catalog’s resources automatically extend to users assigned to the access package.
Access package managers, however, are limited to using the resources already available in the catalog and cannot add new ones. If additional resources are needed, they must request assistance from the catalog owner.
Each access package must include at least one policy, which governs who can request access, approval workflows, lifecycle settings, and whether access is assigned automatically. When creating an access package, an initial policy can be defined for directory users, external users, or direct administrative assignments.

1. Sign In: Log in to the Microsoft Entra admin center using an account with Identity Governance Administrator permissions.
2. Navigate to Identity Governance: Go to Identity governance > Entitlement management > Access package.

3. Create a New Access Package: Click on New access package to begin the creation process.

4. Configuring the Basics for an Access Package
Basics Tab: Start by providing the essential information for the access package.
Name and Description: Enter a display name that clearly identifies the access package.
Write a description explaining its purpose. This information is visible to users when they request access.

5. Select a Catalog:
From the Catalog dropdown, choose the catalog where the access package will reside. For example, select a “Marketing Catalog” if it is managed by a catalog owner handling marketing resources.
Note: Only catalogs where you have permissions will appear in the list.
6. Permissions:
To create an access package in an existing catalog, you must either:
Be an Identity Governance Administrator, or
Be a catalog owner or access package manager for that catalog.
Creating an Access Package in a New Catalog
If the desired catalog is not listed and you have the appropriate permissions (as an Identity Governance Administrator or catalog creator):
Create a New Catalog:
- Select Create new catalog in the Catalog dropdown.
- Enter a catalog name and description that reflect its purpose.
- Click Create to finalize the new catalog.
Resource Management:
- The access package you are creating, along with any included resources, will be added to the new catalog.
- You can later add catalog owners or manage attributes for the catalog’s resources.
Editing Resource Attributes:
- To update attributes for catalog resources, consult the guide on Add resource attributes in the catalog. Ensure you meet the necessary role prerequisites.
Proceed to Resource Roles:
- Once the catalog is set, click Next: Resource roles to continue the access package configuration.

Resource Roles Tab: On this tab, specify the resources and their roles to include in the access package. Users who are granted the package will automatically receive the selected resource roles (e.g., group membership).
Optional Step:
- If you’re uncertain about which resource roles to add, you can skip this step and add them later after the access package is created.
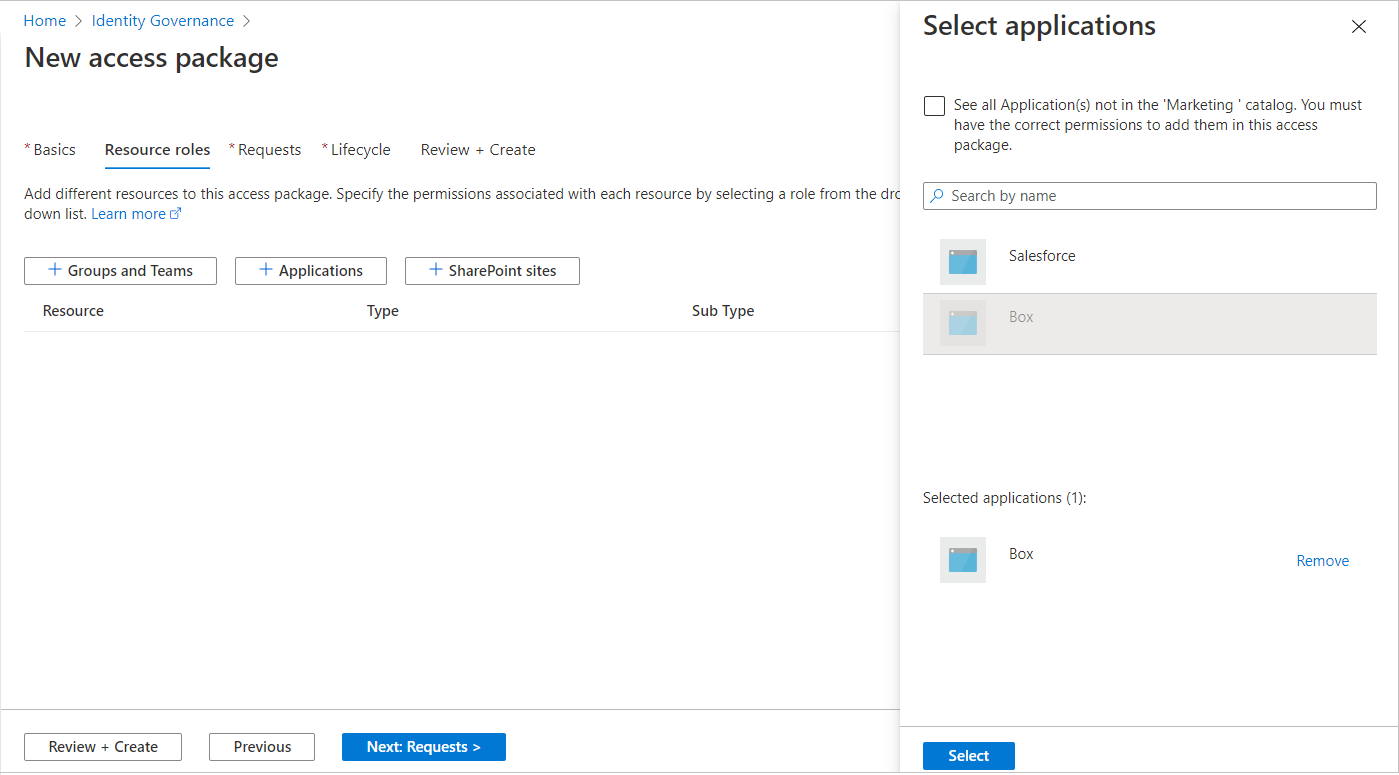
Choose Resource Types:
- Select the type of resource you want to include:
- Groups and Teams
- Applications
- SharePoint sites
- Select the type of resource you want to include:
Select Resources:
- In the Select applications panel, choose one or more resources from the list.
Proceed:
- After selecting the resources, click Next to continue to the next configuration step.

Key Details for Selecting Resource Roles
Resource Selection Based on Catalog Type:
- General Catalog or New Catalog: You can select any resource from the directory that you own. This requires being at least an Identity Governance Administrator or catalog creator.
- Existing Catalog: You can select resources already in the catalog, even if you are not their owner.
Dynamic Membership Groups:
- You can add dynamic membership groups to a catalog and access package.
- For dynamic groups, only the owner role is available when managing them in an access package.
Additional Resource Options for Administrators:
- If you are an Identity Governance Administrator or catalog owner, you can also select resources you own or manage that are not yet in the catalog.
- These resources will be added to the catalog for use by other catalog administrators.
Viewing All Directory Resources:
- To see all resources in the directory that can be added to the catalog, check the See all option in the selection panel.
- To limit the selection to resources currently in the catalog, leave the See all checkbox unchecked (default state).
Assigning Roles:
- In the Role list, choose the role users will be assigned for each selected resource.
- Refer to documentation on determining appropriate roles to include in an access package for detailed guidance.
Proceed to Next Step:
- After configuring resources and roles, continue by clicking Next to move to the subsequent step

Creating the Initial Policy for an Access Package
Requests Tab: On this tab, configure the first policy that specifies who can request the access package and define the approval settings.
Initial Policy Options:
- Depending on your requirements, choose one of the following options:
- Allow users in your directory to request the access package: Use this option if you want internal directory users to request access.
- Allow users not in your directory to request the access package: Select this for external users to request access.
- Allow administrator direct assignments only: Choose this option if:
- You’re unsure about request or approval settings at the moment.
- You plan to create assignments for users who already have access to the underlying resources.
- You intend to use automatic assignment policies later for automating access.
- Depending on your requirements, choose one of the following options:
Policy Flexibility:
- After the access package is created, you can add more policies. These additional policies can:
- Allow other groups of users to request access with customized approval settings.
- Assign access automatically without user requests.
- After the access package is created, you can add more policies. These additional policies can:
Next Steps:
- Once the initial policy is configured, proceed with the next steps to finalize the access package creation process.

Allowing Users in Your Directory to Request the Access Package
-
Define the Request Policy:
- Use this approach to let users in your directory request the access package.
- You can specify individual users or, more commonly, groups of users (e.g., a group like All employees). Adding a group means any member of that group can request the access package.
-
Users Who Can Request Access:
- In the Users who can request access section, select For users in your directory.
-
Refine User Selection:
- When this option is selected, additional settings appear to allow further refinement of who can request access.
- Define specific users or groups that should be eligible to request the package.
-
Proceed:
- After refining the selection, continue configuring the policy settings, such as approval workflows and lifecycle details.
-
Save and Next:
- Once configured, save the policy and proceed to the next steps in the access package creation process.

Refining Access Package Requests: Options and Configuration
-
Select Who Can Request Access:
Choose one of the following options based on your requirements:-
Specific users and groups:
- Restrict access requests to specified users or groups in your directory.
- After selecting this option, click Add users and groups.
- In the Select users and groups pane, choose the users and groups to include.
-
All members (excluding guests):
- Allow all member users in your directory to request the access package.
- Guest users (external users invited via Microsoft Entra B2B) are not included.
-
All users (including guests):
- Allow all member users and guest users in your directory to request the access package.
-
-
Understanding Guest Users:
- Guest users are external individuals invited into your directory via Microsoft Entra B2B.
-
Finalize Selection:
- Once you’ve specified the users or groups eligible to request the package, proceed to configure approval and lifecycle settings.
-
Choose Select to add the users and groups.

Allowing Users Not in Your Directory to Request the Access Package
-
Guest User Requests:
- This option is useful if you want external users (who aren’t yet part of your directory) to request access to the package. These users might be from another Microsoft Entra directory or domain.
- Important: To allow invitations, your Microsoft Entra directory must be configured for external collaboration.
-
Guest User Account Creation:
- When an external user requests access and their request is approved (or doesn’t need approval), a guest user account is created for them.
- The guest won’t receive an invite email but will be notified once the access package assignment is delivered.
- When the guest’s last access package assignment expires or is canceled, their account will be blocked and eventually deleted by default.
-
Keep Guest Users in Directory:
- If you want guest users to remain in your directory even after losing all access package assignments, you can adjust the settings in your entitlement management configuration.
-
Configuring the Request Policy:
- In the Users who can request access section, select For users not in your directory.
- After selecting this option, additional settings will appear for further refinement.

Allowing External Users from Connected Organizations to Request the Access Package
Options for External User Requests:
Choose one of the following options to control which external users can request the access package:
Specific connected organizations:
- Select this option if you want only users from specific external organizations that your administrator has previously added.
- Click Add directories to select from a list of connected organizations.
- If the desired organization isn’t listed, ask your administrator to add it as a connected organization.
All connected organizations:
- Choose this option if users from all connected organizations (all external Microsoft Entra directories or domains) can request the access package.
- Verify the list of connected organizations that are currently configured.
All users (All connected organizations + any new external users):
- Select this option if any external users can request access, with the B2B allowlist or blocklist settings taking precedence for new external users.
- This will allow users from all organizations, including those that were not previously connected, based on your allowlist or blocklist rules.
- You can specify a social identity provider domain (e.g., live.com), allowing any user from that provider to request access.
Configure Approvals:
- If you selected All users, be sure to configure the appropriate approval settings, as this scope will allow any external user (identity on the internet) to request access.
Finalize Configuration:
- After selecting the external organizations or setting the scope for external requests, click Select to finalize your choice.
- All users from the selected connected organizations will be able to request the access package, unless blocked by B2B settings.
Proceed to Approval Settings:
- Once you’ve selected the organizations and completed the setup, continue to the Specify approval settings section to define how requests will be handled.

Administrator Direct Assignments Only
Direct Assignment Without Access Requests:
- Use this option if you want administrators to directly assign users to the access package without requiring users to request it.
- There are no request settings in this configuration, but you can still apply lifecycle settings for access management.
Configure the Request Policy:
- In the Users who can request access section, select None (administrator direct assignments only).
- This option ensures that access requests are bypassed, and only administrators can assign users to the access package.
Assigning Users:
- After the access package is created, you can directly assign both internal and external users.
- For external users, a guest user account is created in your directory automatically.
Proceed to Enable Requests:
- Skip down to the Enable requests section to continue configuring other aspects of the access package if necessary.

Specifying Approval Settings for Access Package Requests
Approval Requirement:
- In the Approval section, define whether an approval is required for users requesting the access package.
- Set the Require approval toggle to Yes to require approval for requests or No to automatically approve them.
- Note: If external users are allowed to request access, it’s recommended to require approval for better oversight of who is added to your organization’s directory.
Requestor Justification:
- To require users to provide a reason when submitting a request, set the Require requestor justification toggle to Yes.
- This ensures that users must explain why they are requesting access to the package.
- To require users to provide a reason when submitting a request, set the Require requestor justification toggle to Yes.
Approval Stages:
- Single-Stage Approval: If you want only one approver to approve the request, set the How many stages toggle to 1.
- Two-Stage Approval: If you require approval from two different approvers, set it to 2.
- Three-Stage Approval: If you want a three-stage approval process, set the toggle to 3.

Approver Roles:
- The approvers can be various roles, such as:
- Manager
- Sponsor of the user
- Internal sponsor
- External sponsor


- Only one approver from each stage is needed to approve a request for single-stage or two-stage approval.
- The request is approved based on the first approver who reviews the request.
- The approvers can be various roles, such as:
Finalize and Proceed:
- After configuring the approval settings, continue to the next steps of your access package creation process.
- In a single-stage approval process, you can designate specific approvers for users requesting access to an access package.
If the policy is for users in your directory, you can choose Manager, Sponsors, or specific users as approvers. For users not in your directory, options include External sponsor or Internal sponsor. Fallback approvers can also be added in case the primary approver is unavailable. You can set a time frame within which the approver must make a decision, and if not, the request is automatically denied. Optionally, you can require approvers to provide justification for their decision, visible to other approvers and the requestor.
Adding Requestor Information to an Access Package
-
Access the Questions Tab:
- Go to the Requestor information tab and select the Questions tab.
-
Add a Question:
- In the Question box, enter the question you want to ask the requestor. This question is displayed to the user during the access request process.
-
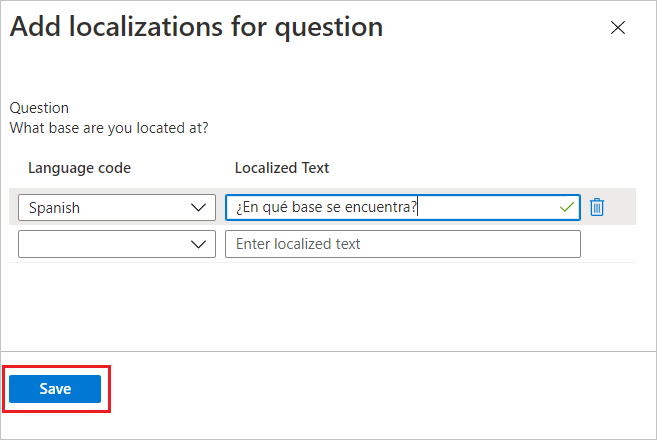
Localization Options:
- To add localized versions of the question, select Add localization.
- In the Language code field, select the language for localization, and in the Localized Text box, enter the translated question.
- After adding all necessary localizations, select Save.
-
Select Answer Format:
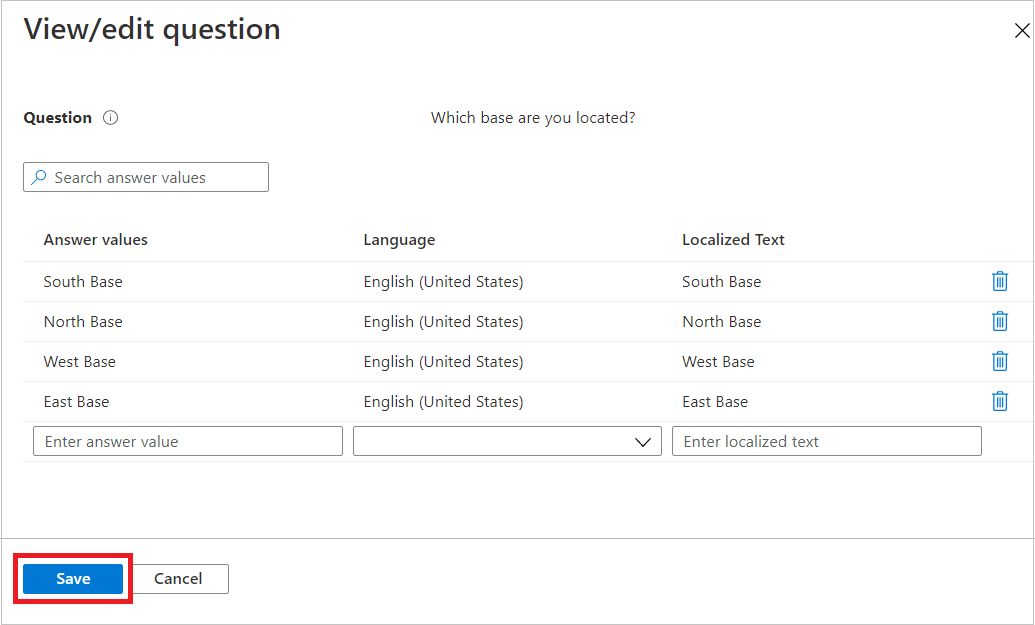
- Choose the Answer format: Short text, Multiple choice, or Long text.
- If you choose Multiple choice, select Edit and localize to configure answer options.
- In the Answer values boxes, enter response options.
- You can also localize these options by selecting the language in the Language boxes.
- Select Save once done.
-
Make the Question Required:
- If you want requestors to answer this question before submitting a request, check the Required checkbox.
-
Review Associated Attributes:
- Select the Attributes tab to view the attributes related to the resources added to the access package.
- To add or update attributes, visit Catalogs and locate the associated catalog.
-
Continue Setup:
- Once completed, select Next to proceed with the next steps in creating the access package.

-
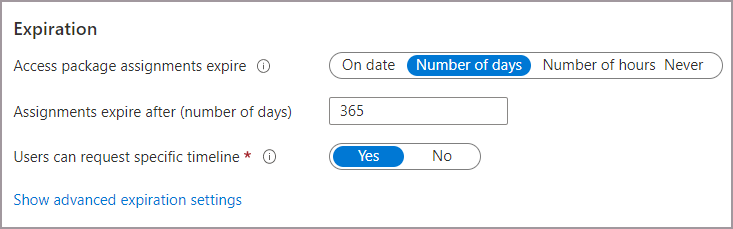
Set Expiration for Assignments:
- On the Lifecycle tab, define when a user’s assignment to the access package expires. You can choose one of the following options:
- On date: Specify a future expiration date.
- Number of days: Set a duration in days (0 to 3660 days).
- Number of hours: Specify how many hours after approval the assignment expires.
- Never: The assignment does not expire.
- On the Lifecycle tab, define when a user’s assignment to the access package expires. You can choose one of the following options:
-
Allow Users to Request Specific Timeline:
- If you want users to request specific start and end dates for their access, toggle the Users can request specific timeline to Yes.
-
Advanced Expiration Settings:
- Select Show advanced expiration settings to access additional configuration options.
-
Allow Extension of Access:
- To allow users to extend their assignments, set Allow users to extend access to Yes.
- If this option is enabled, users will receive an email 14 days and 1 day before their access expires, prompting them to request an extension.
- To allow users to extend their assignments, set Allow users to extend access to Yes.
-
Extension Date Rules:
- The extension request must fall within the allowed time frame based on the expiration date set by the policy. For example, if an assignment expires on June 30, the extension request must be on or before that date.
- After the extension, users cannot request the access package past the extension date.
-
Require Approval for Extensions:
- If you want to require approval for extension requests, set Require approval to grant extension to Yes.
- This approval will follow the same settings defined in the Requests tab.
- If you want to require approval for extension requests, set Require approval to grant extension to Yes.
-
Complete Setup:
- Once completed, select Next or Update to proceed with the next steps.
-
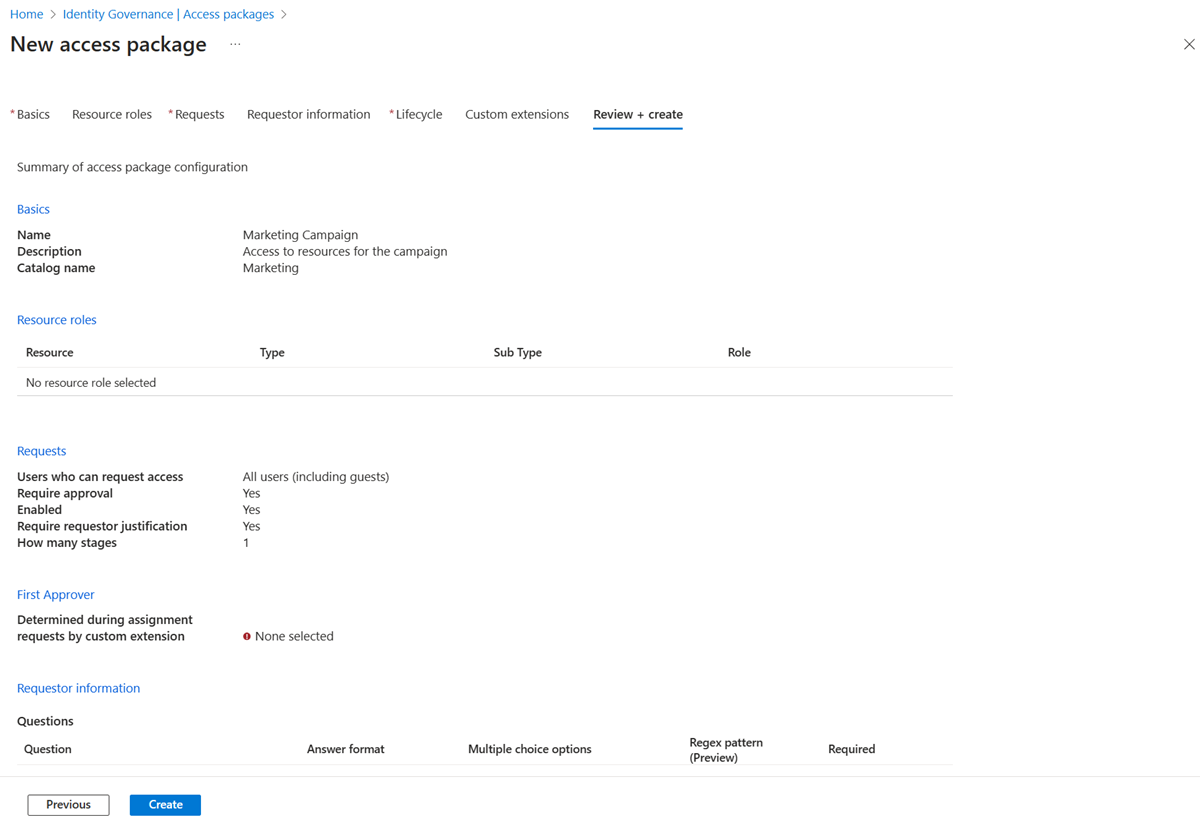
Review Settings:
- On the Review + create tab, thoroughly review the settings of your access package to ensure everything is configured as intended.
- Check for any validation errors or inconsistencies that need to be addressed.
-
Create Access Package:
- Once you’re satisfied with the settings, select Create to finalize the creation of the access package and its initial policy.
-
Access Package Visibility:
- By default, the access package is visible to everyone in the scope of the policies. If you want it to be visible only to users with the direct link, edit the access package settings and set Hidden to Yes.
- Afterward, you can copy the direct link to the access package and share it with the specific users who need access.
-
Next Steps:
- After creation, you can add more policies to the access package, set up separation of duties checks, or directly assign access to specific users.


Leave a Reply