
Azure AD Connect Installation and Setup Prerequisites
Before downloading and installing Azure AD Connect, ensure your on-premises Active Directory (AD) and Azure environments meet the necessary requirements. This guide outlines the prerequisites and steps to confirm readiness.
General Installation Requirements
1. Server Domain and OS Requirements
- The server must be joined to your on-premises AD domain and run Windows Server 2016 or newer.
- To check the server version, press Win + R, type
winver, and click OK.

2. .NET Framework Version
- Azure AD Connect requires at least .NET Framework 4.6.2.
- To verify, open PowerShell and run:
Get-ChildItem 'HKLM:\SOFTWARE\Microsoft\NET Framework Setup\NDP' -Recurse | Get-ItemProperty -Name Version, Release -EA 0 | Where { $_.PSChildName -Match '^(?!S)\p{L}'} | Select PSChildName, Version, ReleaseEnsure the installed version meets or exceeds the minimum requirement.

3. PowerShell Execution Policy
- Azure AD Connect requires PowerShell scripts to run, so the execution policy must be set to
RemoteSigned. - To check, run:
Get-ExecutionPolicyIf it returns a different policy, use Group Policy to change it:
- Navigate to Computer Configuration > Policies > Administrative Templates > Windows Components > Windows PowerShell.
- Enable the Turn on Script Execution policy and select All local scripts and remote signed scripts.

4. Additional Server Requirements
- Azure AD Connect cannot be installed on a Server Core or older versions of Windows Server Essentials.
- Ensure the server has a full GUI and is not running Small Business Server.
Network Connectivity Prerequisites
1. DNS Resolution
- Verify that your internal DNS resolves all domain names registered in your Microsoft 365 Admin Center account.
- Use the
nslookupcommand to confirm domain name resolution for both on-premises AD and Azure AD.

2. Proxy Server Configuration
- If your organization uses a proxy server, modify the
machine.configfile located atC:\Windows\Microsoft.NET\Framework64\v4.0.30319\Config\. - Add the following code, replacing
<PROXYADDRESS>and<PROXYPORT>with your proxy details:<system.net> <defaultProxy> <proxy usesystemdefault="true" proxyaddress="http://<PROXYADDRESS>:<PROXYPORT>" bypassonlocal="true" /> </defaultProxy> </system.net>

- For authenticated proxies, use a group Managed Service Account (gMSA) and update the configuration accordingly.
On-Premises Active Directory Requirements
1. Schema Version and Forest Functional Level
- The AD schema version must be Windows Server 2003 or higher. Use PowerShell to verify:
(Get-ADObject (Get-ADRootDSE).schemaNamingContext -Property objectVersion).objectVersion

-
- The forest functional level must also be Windows Server 2003 or higher. Check it with:
(Get-ADForest).ForestMode
- The forest functional level must also be Windows Server 2003 or higher. Check it with:

2. Writable Domain Controller
- Azure AD Connect does not support read-only domain controllers (RODC). Ensure the selected domain controller is writable.
3. Enable Active Directory Recycle Bin (Optional)
- Enabling the AD Recycle Bin simplifies object recovery but is irreversible. Consider the implications before enabling it via the Active Directory Administrative Center.
Step-by-Step Installation and Setup
1. Download Azure AD Connect
- Download the installation package from the Microsoft Azure AD Connect page.
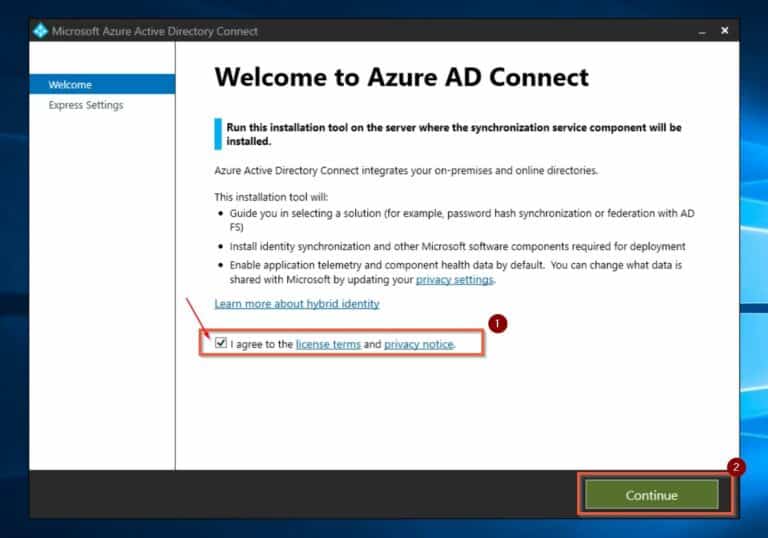
2. Run the Installer
- Double-click the downloaded file, accept the license terms, and choose either Express Settings or Customize for advanced options.

If you wants to import the configuration from another server to have the same config, Check my previous Post to configure the Staging Server.

3. Configure User Sign-In
- Choose a sign-in method, such as Password Hash Synchronization, to allow on-premises AD credentials to authenticate with Azure AD.

Which permissions you require depends on the optional features you enable. If you have multiple domains, the permissions must be granted for all domains in the forest. If you don’t enable any of these features, the default Domain User permissions are sufficient.


4. Connect Directories
- Add and configure your on-premises AD domain. Use an account with Enterprise Admin privileges to enable synchronization.


Note :- The domain which we are syncing to cloud should be an verified domain if we are using the domain which is not verified in azure then portal will add onmicrosoft.com suffix after your domain name. For Example :


5. Select OU and Domain Filtering
- Choose specific organizational units (OUs) or domains to sync, or sync all by default.


6. Configuring Unique Identification for On-Prem Users in Azure AD
To configure how Azure AD uniquely identifies your on-premises Active Directory users, follow these steps:
-
Identify Unique User Attributes:
If your Active Directory users have unique identifiers, such assAMAccountName, it is advisable to use the default option under the section titled “Select how users should be identified in your on-premises directories.” This ensures a consistent and reliable mapping of user identities. -
Azure AD Identification Defaults:
Similarly, it is recommended to accept the default setting in the “Select how users should be identified with Azure AD” section. This setting ensures seamless synchronization and integration between your on-premises Active Directory and Azure AD. -
Proceed to the Next Step:
Once you have reviewed and confirmed the settings for both sections, click Next to continue with the setup process.

7. Configuring Initial Sync in Azure AD Connect
To set up how Azure AD Connect performs the initial synchronization of your users and devices, follow these steps:
-
Choose Between Test Sync or Full Sync:
- If you are piloting your deployment, create an AD Security Group that contains the users and devices you want to test.
- On the Filter users and devices page, choose the Synchronize selected option. Enter the name of the AD group you created, select Resolve, and then click Next to proceed.
-
Full Synchronization (Default):
- If you are ready to sync all users and devices from the containers selected in step 10, choose the default option: Synchronize all users and devices.
- Click Next to continue.

8. Configuring Additional Features and Finalizing Azure AD Connect Installation
-
Select Additional Features:
- On the Additional Features page, review the options available.
- To learn more about any feature, click the help (?) icon next to it.
- Check the features you want to enable based on your organization’s requirements.
-
Review Your Configuration:
- On the final page, review all your selections to ensure they align with your deployment strategy.
-
Synchronization Settings:
- By default, the Start the synchronization process when configuration completes checkbox is selected.
- For production environments, it is strongly recommended to also check the Enable staging mode checkbox to test the configuration without immediately impacting your environment.
-
Install the Configuration:
- For this demonstration, I’ll accept the defaults (synchronization starts immediately without staging mode).
- Click the Install button to complete the setup.
Once installed, Azure AD Connect will begin syncing users and devices based on the options you configured.


- Confirm that selected users and groups are successfully synchronized from on-premises AD to Azure AD.


Conclusion
Azure AD Connect is essential for synchronizing on-premises AD with Azure AD. While the setup involves careful planning and prerequisite checks, following this guide ensures a smooth installation and configuration process.
Working hard every day but still barely moving forward? It’s time to stop the endless grind.
Discover how people are earning real money from trading — no office, no boss, no limits.
One simple app could be your ticket to financial freedom: https://youtu.be/VmHYisHHOtU
to UNSUBSCRIBE:
https://casatemporada.site/unsubscribe?domain=cloudknowledge.in
Address: 108 West Street Comstock Park, MI 48721
SOFTWARE: New AI Cloud-Tool Quietly Turns Simple Ideas Into Passive Royalties….
…No tech. No product. No audience. Just this one AI tool.
https://www.novaai.expert/OhanashiGenAI
to UNSUBSCRIBE:
https://www.novaai.expert/unsubscribe?domain=cloudknowledge.in
Address: 209 West Street Comstock Park, MI 49321
Why you need this: to have every campaign, affiliate offer, or project start delivering traffic and income today — without spending a dime on ads or tech headaches. Ghost Pages turns you into a stealth engine that Google absolutely trusts: you build invisible pages using a secret Google asset, and they quietly start delivering targeted visitors — while your competition is nowhere the wiser.
It’s easy, it’s fast, it’s genius: no domains, hosting, social media, or technical skills required — if you can click and copy, you can do this. Plus, it really works and scales: launch one Ghost Page and BAM — traffic flows wherever you want: affiliate links, e‑com, leads — you choose. Ready to start in minutes? Discover how and get results that might blow your mind.
See it in action: https://deluna101a.site/GhostPages
You are receiving this message because we believe our offer may be relevant to you.
If you do not wish to receive further communications from us, please click here to UNSUBSCRIBE:
https://deluna101a.site/unsub?domain=cloudknowledge.in
Address: Address: 1464 Lewis Street Roselle, IL 60177
Looking out for you, Michael Turner.
World’s First AI Agent Powered By ChatGPT-5…
That Writes And Ranks Anything We Want… On The First Page Of Google… With ZERO SEO. And Zero Ads…
https://dfhggfg.site/APEX-AI?cloudknowledge.in
You are receiving this message because we believe our offer may be relevant to you.
If you do not wish to receive further communications from us, please click here to UNSUBSCRIBE:
https://dfhggfg.site/unsub?domain=cloudknowledge.in
Address: Address: 1464 Lewis Street Roselle, IL 60177
Looking out for you, Michael Turner.
Create High-Quality Ebooks up to 180 Pages in Minutes Without Writing a Single Word Yourself…
https://vespa777g.site/eBookWriterAI?cloudknowledge.in
You received this notification
as we believe
our offer
may interest you.
If you would prefer not to receive
further communications from us,
simply
unsubscribe from these emails:
https://vespa777g.site/unsub?domain=cloudknowledge.in
Address: Address: 7174 Rua Andre Luiz 1278, MG 37704-056
Looking out for you, Reginald Lefroy.
Hi,
I’m reaching out because https://HostRest.com is now available. In the high-stakes IT infrastructure and managed services market, this domain is a “Category-Killer” that addresses the #1 concern of CTOs: System Reliability.
This asset offers your company a powerful strategic advantage:
The “Peace of Mind” Brand: In an industry defined by uptime and stress, “HostRest” signals a stable, managed environment where clients can finally rest easy.
Lower CAC: A short, rhythmic, 8-letter .com that is easy to recall, reducing your dependence on expensive “Web Hosting” or “Managed IT” PPC keywords.
Instant Authority: A premium .com signals a world-class infrastructure, building immediate “Speed to Trust” during the high-ticket sales cycle.
I am offering this to a select few leaders in the IT hosting space before it hits the open market.
Are you open to a quick discussion about securing https://HostRest.com for your brand?
Sincerely,
Ihab Elsaeed
Brand Strategist
egacs@egacs
Toll Free (U.S. and Canada): 1-855-646-1390 or 866-829-9361
International: +1 781-373-6808 or +1 339-222-5145
Cloudknowledge In
Your Ultimate Guide to Configuring Azure AD Connect – Cloud Knowledge
Scale your arbitrage operations instantly with FlipNinja’s AI, which automates the hunt for 50%–500% profit flips across Amazon, Walmart, and AliExpress. Secure an unfair data advantage for a one-time $17 investment and stop guessing where your next high-margin deal is coming from.
https://www.youtube.com/watch?v=FgXeh1S8NXg
Hi,
I’m reaching out because OnlineIpchanger.com is now available for acquisition.
Securing this “Category-Killer” domain offers your firm a massive strategic edge:
14 Years of Domain Authority: This is an aged asset with a deep history, providing a major SEO head start and “Speed to Trust” that a new registration simply cannot match.
Instant Organic Moat: It captures high-volume, exact-match search intent for your core service, allowing you to bypass expensive PPC bidding and own the “top-of-funnel” traffic.
The “Authority Redirect”: Use it as a permanent lead-generation tool to siphon high-intent users directly to your primary platform.
Tax-Efficient Asset: As an intangible business asset, this acquisition typically qualifies for tax-deductible amortization (e.g., Section 197).
I can also send over samples of how your competitors use similar “utility domains” to steal market share.
I am offering this to a select few leaders in the privacy and VPN space .
Are you open to a quick discussion about bringing https://OnlineIpchanger.com into your portfolio?
Best,
Ihab Elsaeed
Brand Strategist
egacs@egacs.com
Toll Free (U.S. and Canada): 1-855-646-1390 or 866-829-9361
International: +1 781-373-6808 or +1 339-222-5145
Cloudknowledge In
–
Your Ultimate Guide to Configuring Azure AD Connect – Cloud Knowledge
Hello,
https://DollarsCloud.com available for sale with special limited time offer, does that interest you?
Best regards,
Ihab Elsaeed
Brand Strategist
egacs@egacs.com
Toll Free (U.S. and Canada): 1-855-646-1390 or 866-829-9361
International: +1 781-373-6808 or +1 339-222-5145
Cloudknowledge In
–
Your Ultimate Guide to Configuring Azure AD Connect – Cloud Knowledge
Your article helped me a lot, is there any more related content? Thanks!
Hi,
World’s First AI Traffic Agent That Inserts Your Links or Offers Directly Inside 2.5+ Billion Daily AI Answers Across ChatGPT, Gemini, Claude, Grok, Perplexity & Google AI Overviews At the Press of A Button
100% Free Traffic – No ads, no SEO, no social media marketing. All traffic comes from Amazon’s built-in audience.
No Monthly Fees – Pay once and keep 100% of your profits forever.
Check demo at https://shorturl.at/X5dZW
Cloudknowledge In
Your Ultimate Guide to Configuring Azure AD Connect – Cloud Knowledge