What is Certificate-Based Authentication (CBA)?
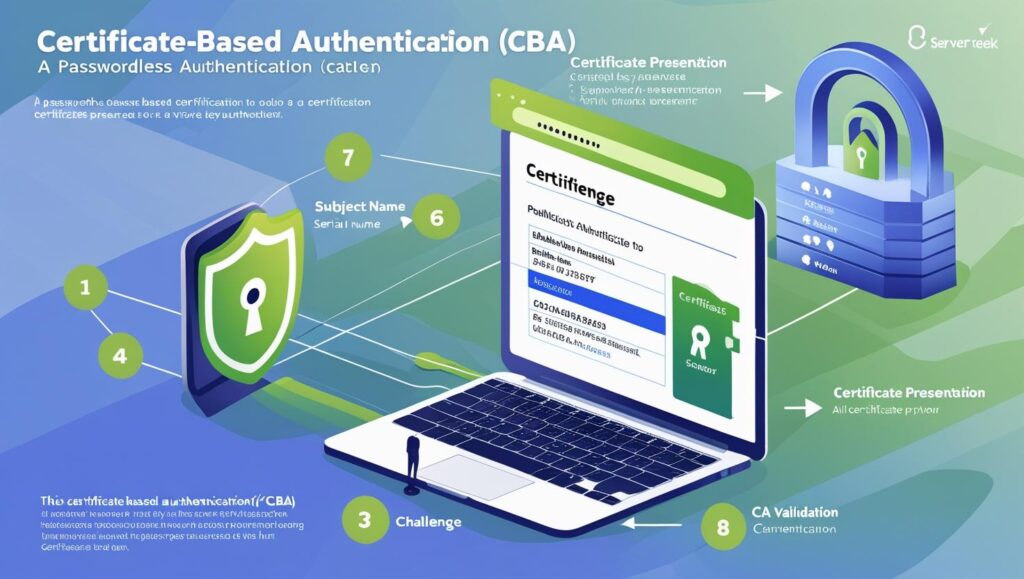
Certificate-Based Authentication (CBA) is a passwordless authentication mechanism that relies on digital certificates issued by a trusted Certificate Authority (CA). It replaces traditional passwords with cryptographic keys to verify the identity of users, devices, or services.
💡 How It Works:
-
A digital certificate contains information such as a public key, subject name (user/device info), serial number, issuer info, and more.
-
The certificate is installed on the client device (or stored in a smartcard, USB key, or TPM).
-
When a user attempts to authenticate, the system challenges the certificate.
-
The user proves possession of the private key associated with the certificate.
-
The authentication server validates the certificate against the trusted CA chain and checks for revocation.
This ensures the entity presenting the certificate is legitimate.

Microsoft Entra and CBA
Microsoft Entra ID (formerly Azure Active Directory) supports CBA for both cloud-native and hybrid identities. It allows users to sign in to:
-
Web applications (e.g., Microsoft 365)
-
Entra-joined or hybrid-joined devices
-
Conditional Access-enabled services
📈 Why Use CBA? | |
Benefit | Description |
🛡️ Phishing Resistant | Private keys are never shared and certificates can’t be socially engineered like passwords. |
💼 Enterprise-Grade Security | Supports strict compliance needs like those in finance, defense, and healthcare. |
🔐 Passwordless Experience | Users only need to insert a smartcard or token, select a certificate, and enter a PIN. |
🧰 No On-Prem Required | Cloud-native configuration using Microsoft Entra Admin Center — no need for ADFS or on-prem servers. |
🔄 Support for SSO & MFA | CBA integrates with Microsoft Conditional Access and MFA policies. |
🌍 Device & Endpoint Compatibility | Works on Windows, macOS, iOS, Android, smartcards, YubiKeys, and virtual smartcards. |
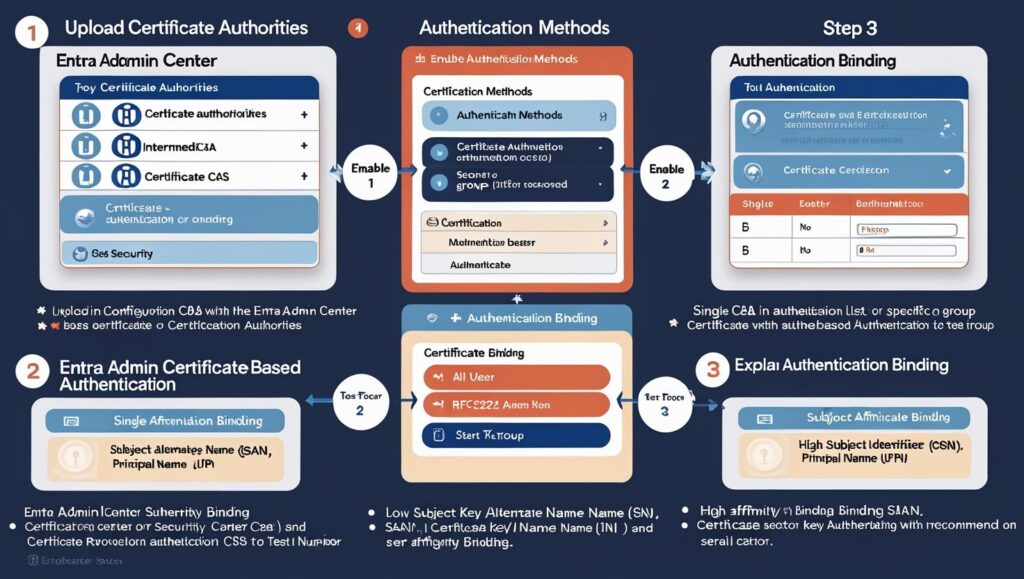
Step-by-Step CBA Configuration in Microsoft Entra
🔧 Pre-requisites
Trusted CA(s) issuing certificates
Certificate templates with subject/issuer info
CRL or OCSP endpoint (for revocation)
Group of users for testing

Step 1: Upload Certificate Authorities
📍Where:
Entra Admin Center → Protection → Security Center → Certificate Authorities
📄 What You Upload:
-
Root CA: The top-most authority in the chain
-
Intermediate CA(s): Subordinate authorities issuing certificates
🛑 Important Configuration:
-
Configure the Certificate Revocation List (CRL) or OCSP.
-
Without this, revoked certificates will still be accepted, posing a major risk.
💡 Tip: Use Base64 PEM format when uploading.
Step 2: Enable CBA in Authentication Methods
📍Where:
Entra Admin Center → Authentication Methods → Certificate-Based Authentication
📌 Configuration Options:
-
Targeting: Choose either “All users” or a specific group.
-
Best practice: Use a test group first.
-
-
-
🔐 Single Factor: Cert only.
-
🔐 Multi-Factor: Certificate protected with biometric or PIN.
-
-
Default Binding Strengths:
-
Can be overridden using custom rules based on Policy OID, Issuer, or Certificate Field.
-
Step 3: Authentication Binding
Authentication binding defines the strength of the authentication method used.
🟡 Low Affinity Binding:
-
Uses certificate fields like:
-
Subject Alternative Name (SAN)
-
RFC822 Name
-
Principal Name (UPN)
-
-
These can be reused and don’t change on certificate rotation.
🟢 High Affinity Binding:
-
Uses fields like:
-
Serial Number
-
These are unique and regenerate with every certificate issuance.
📊 Security Tip: Always prefer high-affinity bindings for multi-factor scenarios.
Step 4: Create Custom Rules
You can apply custom logic using:
-
Certificate Issuer
-
Policy Object Identifier (OID)
-
Authentication Strength override
-
Binding Strength override
💡Example:
If Policy OID = 1.2.840.113549.1.9.1
, treat it as multi-factor because it was issued to smartcards with biometrics.
Step 5: Configure Username Binding
Username Binding maps a certificate field value to a user attribute in Entra ID.
🔁 Examples:
-
Map
SAN.UPN
→userPrincipalName
-
Map
SKI
→extensionAttribute1
💡 Ensure that the mapped value exists on the user object; otherwise, authentication will fail.
Step 6: Add SKI to User Profile
If you’re using Subject Key Identifier (SKI) for authentication:
-
Locate the certificate.
-
Copy the SKI.
-
Paste it into the corresponding user attribute in Entra.
-
Save changes.
This ensures Entra can map the certificate to the user correctly.

Testing & Validation
-
Use Test Users in your CBA-enabled group.
-
Monitor sign-in logs in Microsoft Entra Admin Center.
-
Validate:
-
Certificate validity and CRL checks
-
Username bindings
-
Authentication method strength
-
Final Thoughts
Microsoft Entra Certificate-Based Authentication delivers a modern, secure, and scalable approach to passwordless identity management. Whether you’re building a Zero Trust architecture, migrating from on-prem solutions, or hardening your user login process, CBA can significantly enhance your security and compliance posture.
Leave a Reply